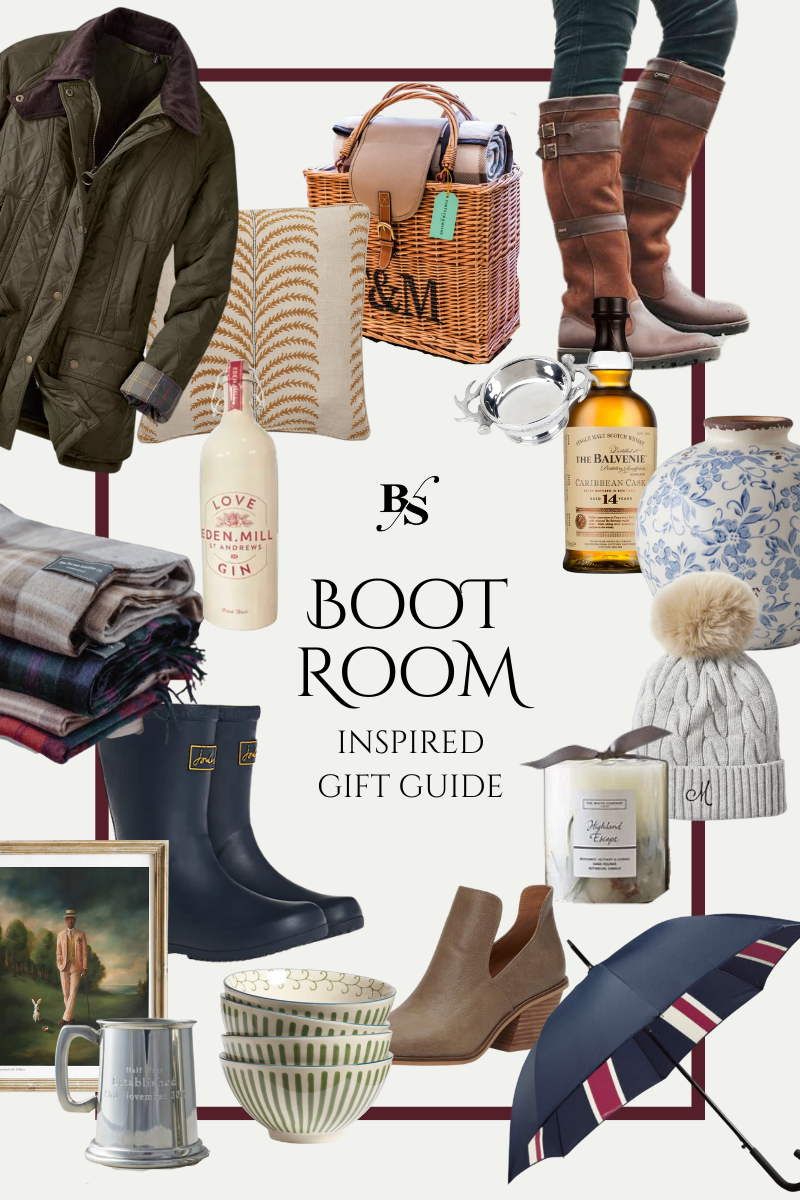
The Boot Room - Reveal
Once Upon a Time… there was a boy and a girl, standing in an odd little “keeping room”… asking why it had a lot of incredible original features, but was a wasted and under-utlised space? With smoked, stained canary yellow walls and not a lot of function, we set about showing it our love with some dramatic updates.
A little more than 18 months ago, we began this room as part of our last One Room Challenge with an enormous list of DIYs and major projects attached, plus lots of really small details - but life got in the way, we had our third baby, and so we’ve only just finished it up last week as part of our marathon 2022 “finish all the unfinished projects” goal. Better late than never hey!! It is SO exciting to finally reveal it all and I’m beyond proud to share this. Please let us know what you think in the comments, and we’ll be producing lots of fun little videos and other snippets over on Instagram too in the coming weeks.
Here’s some other blog posts that led to this moment:
The Plan | Moodboard | Lighting & Rug | Building a Bench | Shoe Storage | Tongue & Groove Paneling
BEFORE
Where we started… the dumping ground of doom! This is our main and most-used entrance to the house (reminder it’s one of our two front doors), so it needed to be hard-working for us, and beautiful for guests, too. After all you only get to make a first impression once. We did not want to change any walls, cupboards, nor touch any of the original woodwork, but did want to increase the function and drama of the space. Even devoid of our piles of stuff, it lacked oomph.


The awkward shape, plus 4 doors, a telephone box, radiator, fireplace and built-ins posed some challenges to add major function for our growing family of 5. We need to contain all the shoes & boots, seasonal coats, hats, snowsuits, etc, but one chair, a tiny shoe rack and a little coat stand weren’t cutting it. Plus, we wanted space for a future dog to have a bed, be able to park a stroller easily when needed for the baby, and still have available floor space, which adding furniture was preventing. We wanted to make it a nice space that was still spacious enough to move around in with lots of people as we can have as many as 5-8 people in here at once! But with function to be able to sit, get warm, dry clothes, put our post, bags and keys down quickly. Here’s a quick review of the before & after floorplans.

WOODWORKING GALORE
The resulting plan was a lot of woodworking, that we did all by ourselves.
We began by paneling all of the walls in a random width T&G that we created and routed from 8’x4’ MDF sheets (so heavy!!). The paneling sits at 6’ height which makes the room feel taller and bigger, a purposeful design decision to give the illusion of more space. We hand-scribed around all of our features including the telephone box (dear lord, I lost sleep over this one! that was hard…), the bookcases, the radiator and light-switches to give them a fully bespoke feel. We created the wood brackets using the same template we created for the kitchen brackets to give continuity between the spaces (and made them out of leftover oak from the kitchen too), and added curves and an ogee routed-edge detail on the shelf above them (again solid oak). Curves were introduced all over the place in this room, to contrast with the stark angles that naturally occurred in this small boxy room. You’ll notice we incorporate the same ogee style treatment on all of the face-finishing work from the shelf, to the trundle, to the shoe cupboard - another design decision that makes our individually bold spaces feel cohesive throughout the house. Adding the paneling and shelf increased the usable space exponentially in this room, as we added new hooks nearly everywhere there was paneling.


To tackle the plethora of shoes & boots of our family - we came up with 3 solutions.
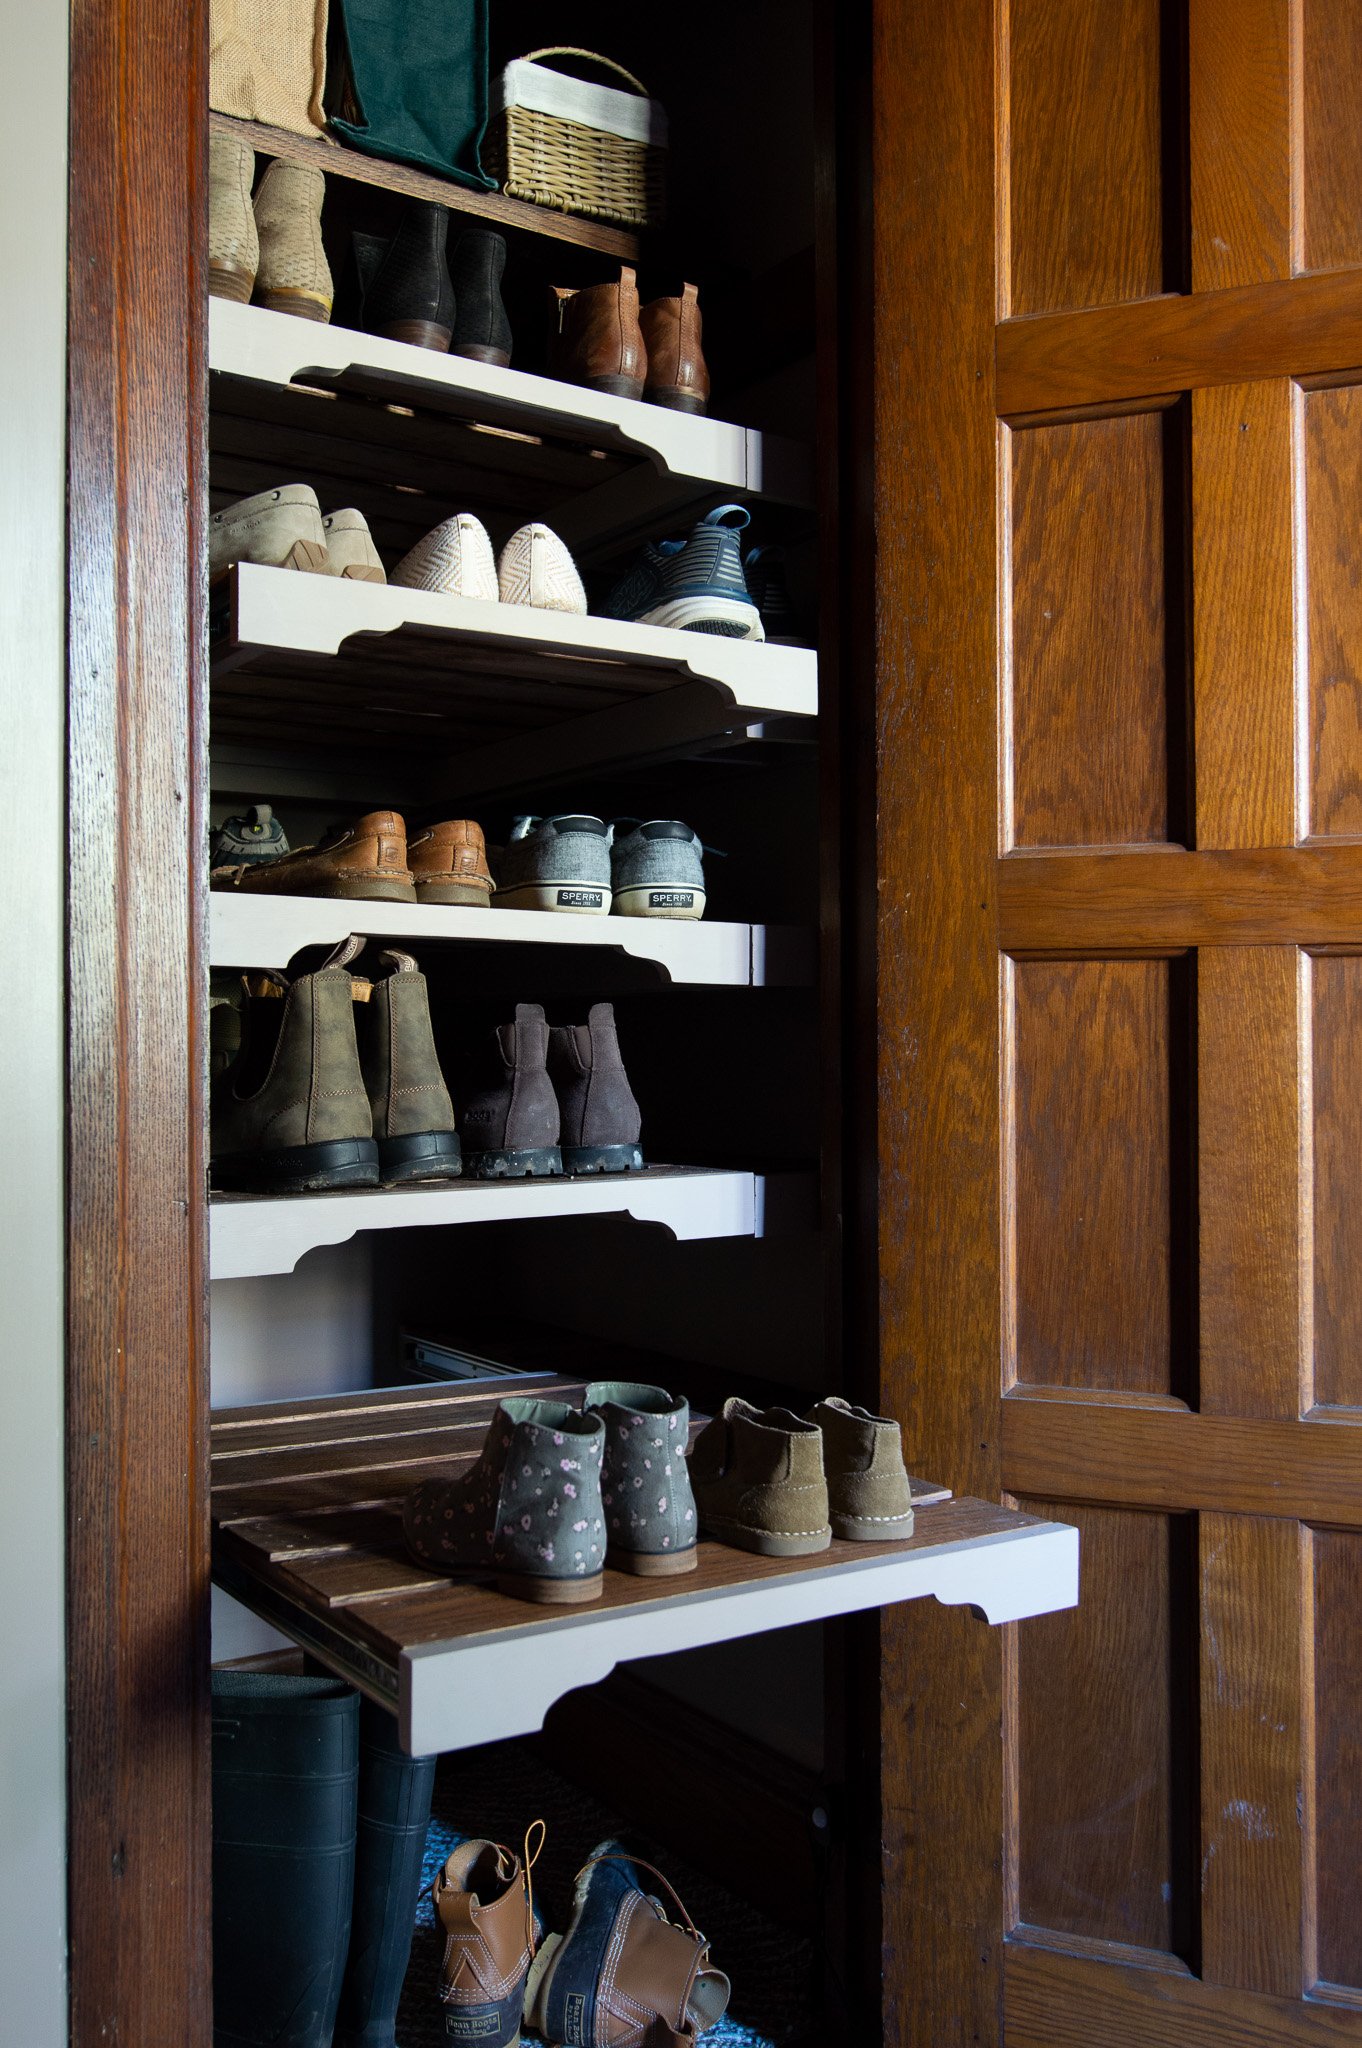
First, we changed the small hanging coat cupboard into a shoe cupboard with sliding “drawers” designed to contain the shoes we needed available, but weren’t wearing that day. We already have another huge coat cupboard in our other entrance, so we prioritised shoes over more unneeded hanging space.
Secondly, the small original oak bookshelf was converted from plain shelves into bespoke boot holders to create practical autumn & winter tall boot storage / drying area. This was again using leftover oak from the kitchen and I created the shapes myself via jigsaw, scroll saw and a lot of Dremel finishing work.
The third essential element is the shoe trundle on small rolling casters under the bench, a spot primarily used by our children to literally throw shoes when they come in the door. All 3 were created from scratch using up as much leftover wood as we could from other projects.


PAINT & STAINING
All of that woodworking, of course, came with oodles of painting and staining work too. We like to order all of our paint from Fenwick & Tilbrook* - a small family-run business from the UK. Not only do they have beautiful colours, but the quality of the paint is outstanding and the customer service is even better. I had a very specific colour palette in mind to create a warm, inviting and cosy library feel to this room. I wanted it to feel like you’d been immediately hugged by the house when you walked in, but I also wanted a statement impact that complemented (not competed with) all the original stained wood.
I started with the red, and while I adored all of the available colours, I ended up creating a bespoke colour that I call “Rogue Port” - it is a mix of 75% Emperor with 25% Winter Garnet. And it’s just perfect! It’s a lovely firey red, with berry undertones though not too purple. A wonderful burgundy colour that’s every bit as yummy as the wine. Many informed me via DMs on Instagram that painting the room red was going to be an exercise in patience, and could take up to EIGHT(!!!!) coats. A testament to the quality of this paint - I could have left it at one coat, but this was two coats and I still have half the 5L can leftover for touch-ups.
For the paneling & fireplace surround, I chose the warm taupe brown Little Donkey in a semi-gloss, which kept the lighter part of the room warm, while not being too gray. Painting it in semi-gloss was dual purpose, by helping to bounce extra light around a very dark room, as well as being extra durable and wipeable for a hard-working space that would see lots of rain-covered jackets and muddy boots. The semi-gloss was definitely a bit harder to paint, but I opted to do it all by hand with a brush to give it a more authentic old-world feel with visible brush strokes.
All of the mdf and painted woodwork was primed with Zinsser BIN and meticulously sanded with 400 grit paper, and then painted with two coats. All new stained woodwork used Minwax English Chestnut to match the original woodwork in the room. The shelf was finished with a poly gloss to ensure high durability, while all other stained woodwork was finished with Tried & True Original Finish (polymerised linseed oil + beeswax) for a natural & sustainable wood surface.
*Disclosure: I do get a small discount which generally covers my international shipping costs, but my thoughts are voluntary


THE DIY UPHOLSTERED SETTEE
The little settee was my piece de resistance of the space, and many enjoyed a somewhat live-Instagrammed version of my building and upholstering process over several weeks (available in this highlight if you’re interested). It was a true labor of love and my first ever attempt at upholstery - on top of my first ever seated-furniture build as I created the base of the seat from scratch, too. The green man 19th century chair legs were an incredible Etsy find from this French shop, while both the beautiful Cusco fabric in Raspberry and twisted cord trim in Linen are from Warner House (not sponsored). All upholstery materials can be found in our Amazon shop - and I’m finishing up the in-depth tutorial for this process shortly.


TEXTURES
The other textures in the room were an integral part of the design to continue the British boutique hotel vibe that we are aiming for around the whole house. A major decision was the custom-sized and shaped rug that fills almost the entire floor area. Having lived with a multitude of other rugs for over a year, we knew this was the only way to get a surface that worked for our needs, and required a custom size due to all the unusual angles. The rug is the Bedford sisal / wool combination in Ginger from Curran (bought with trade designer discounts) that is extremely hard-wearing and yet also soft underfoot when barefoot - so it doesn’t feel scratchy one those boots are off. It hoovers easily and shows very little dirt even despite the white wool. It looks and wears much more nicely than a forever dirty wood floor that is in poor shape.
For the extra muddy winter months, we put an extra mat down. A washable Ruggable variety is shown in some shots (not a brand we recommend), but we prefer L.L.Bean waterhog mats to really contain soak up water and snow. Ours went upstairs as a temporary bathroom fix (long story), but we’ll be buying a few more for the boot room again.
The curtains are Warner House (again not sponsored, this was a major buy but with trade discounts). The curtains are custom lined and pleated in their Ambrogio wool fabric in Marble, which are incredibly heavy and tied in with the wool in the rug. The wool additionally helps keep heat from being lost through the window, absorbs plenty of sound, and we regularly use these to block neighbour views in the evening. We do plan to add a roller blind in this Lewis & Wood Pomegranate fabric in either Sky or Casement for a final design element, but that’s for down the line!
The Aries ram pillow is another Warner House piece that I couldn’t resist, while the blue & red leaf pillow is a Penny Morrison print that came ready made via Haines Collection - a UK company that recycles and sustainably re-sells designer fabric (not sponsored, just a big fan of their work). The blue blanket that lives on the bench to collect dirt is Mackellar Tartan from The Tartan Blanket Co, while the monogrammed white & black windowpane scarf is Mark & Graham (looks discontinued though, sorry I got it a long time ago!!)


HARDWARE
The hardware was another early-in-the-design-process decision. We already had original and incredible 1929 brass and wrought iron pieces in the space from the amazing lionhead door knocker, the door handles (interior and exterior are the same brass though we have not deep-cleaned nor removed any patina) and the letter opening, so we wanted to bring in the same texture around the room. On a lengthy internet search, I found these stunning iron pieces, finished in beeswax that were just perfect from a specialist ironmonger in the UK. All of the gothic coat hooks we added as well as all of the curtain hardware including the rod, brackets, shepherd’s hook finial, and the knob-end tiebacks are From The Anvil. We chose them from here as the spade shape of the hooks matched the original hardware and they offered a large hook capable of holding many coats! They were kind to provide me a 25% discount, and I sourced them through Willow & Stone who provided the international shipping and exceptional customer service. We truly believe getting the texture of these elements was crucial to making the room feel like it had always been this way.


LIGHTING
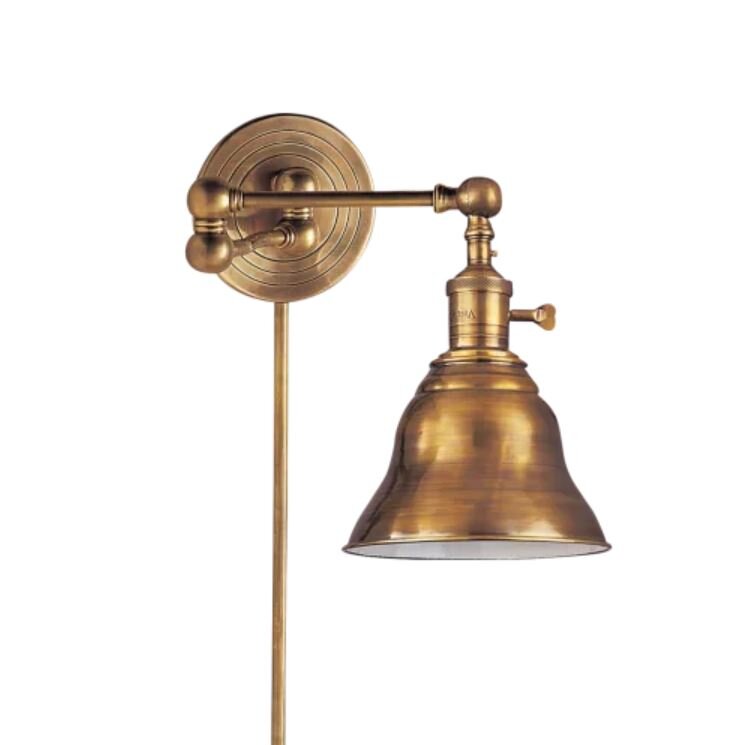
The primary source of frustration in this room was the darkness - with only a single light fixture and a single low-watt bulb we struggled with ever seeing anything! Although we dithered about with the idea of changing the original iron candle-style fixture - we both loved it and couldn’t bear to put it somewhere else. We opted instead to add 3 antique brass Visual Comfort sconces in the Boston swing arm style - two above our bench area for practical task lighting, and the third above the bookcase for ambience, room balance and additional light. The brass nicely complements the Forbes & Lomax solid brass light plates and switches we already had installed as well as the brass handles and small brass tray table we use to dump mail. To increase functionality in another dark spot, we also added LED strip lighting on a motion sensor inside the shoe cupboard, to be able to see all of the usable space right to the very top and easily identify the shoes we needed below.


FIREPLACE
The fireplace doesn’t look like much changed, but actually accounted for 75% of our budget and why we had to DIY almost everything else! This is a small example of Rumford fireplace that once used to host a real log-burning fire - but sadly after a thorough inspection, we learned all of our chimneys required relining and an open fire was no longer an affordable option. On top of that, the behind-the-scenes doesn’t show you that this chimney also houses our boiler flue which was in desperate need of updating as it was leaking carbon monoxide in other parts of the house.
We partnered with Chimney Cricket for a discount to reline the furnace flue which was necessary (see pics of the crane lift and long stainless steel pipe on the ground outside), and then added this little gas-fire coal ventless insert while closing off the flue above (which wasn’t needed). The ventless insert was difficult to source as this fireplace is really tiny… only 19” wide at the back!! Options were very limited. We chose the Hargrove coal basket in the end, a Victorian reproduction line, along with a remote which is a nice little addition. The Chimney Cricket team were great, fast workers completing all the work in a single day and they re-mortared the stones beneath the insert while they were here too! The fire itself is a powerful thing, after using it a few times we only had to have it on for 10 minutes before it heated most of the downstairs!!


ART & ACCESSORIES
The art and the accessories, as with any space, are the finishing touches. Very little was purchased specifically for this room and only a couple items were entirely new.
All of the art bar the two Janet Hill Studio prints above the bench, are items we’ve had for many, many years. But equally, it’s all art you’d find in a British library or pub. The landscape print of St Andrews Beach was a gift from Stu’s grandmother, the black & white framed lithograph set of English buildings and structures were gifts from my mother, the golden Jubilee plate is now perhaps a collector’s item(!), and the antique tennis racquet diagram behind the clock is actually a trophy / certificate of a “real tennis” tournament my father won. One of our favourite pieces in the room is another gift that was received from Instagram friends @allsaintshouse - Anastasiia saw this Tudor house illustration print (behind the brass gold tray on the shelf) out on her antiquing travels and sent it to us, since it reminded her of our house! How sweet is that?!


Likewise, with all of the accessories - we purchased the antique Victorian brass umbrella holder which was another Etsy find (similar one linked here), the blue & white Chinese style floral vase which I lusted after for a solid year before buying was from Kate Marker Home but is no longer sold, and the Fortnum & Mason basket, which was a lovely surprise splurge by Stu one mother’s day especially when it was filled to the brim with biscuits and tea!! The clock, shocker of all shocks, is actually Target. Gasp! It was precisely the size and scale we needed, though the quality is pretty poor. The green boot vase holding eucalytus is from Arhaus, but also discontinued. The tankards, brass tray, quaich, green Moroccan ceramic bowl, books, and horse brasses are a combination of antiques inherited from my dad, items from our travels, wedding gifts and my old school books believe it or not! The cute personalised whiskey barrel was a gift originally from Uncommon Goods and was our first Brooks & Stone branded piece in the house.


FINALLY … THE BOOTS!
I couldn’t sum up a post all about our boot room without giving a nod to all of our favourite boots! You’ll notice almost every picture has a strategically placed pair of boots ;) Between originally living in the UK where wellies are an essential part of life, to now living in a fully seasonal climate where snow boots, walking boots, hiking boots and fashion boots are all equally needed - we have a bigger collection than we imagined. Disclaimer: we buy maybe one pair a year, if that, and we invest in good quality when we do. We don’t believe in throw-away goods, so these are here to be worn, work hard and last for decades. We always strategically buy gender neutral boots for the kids so they can be easily passed down over the years.
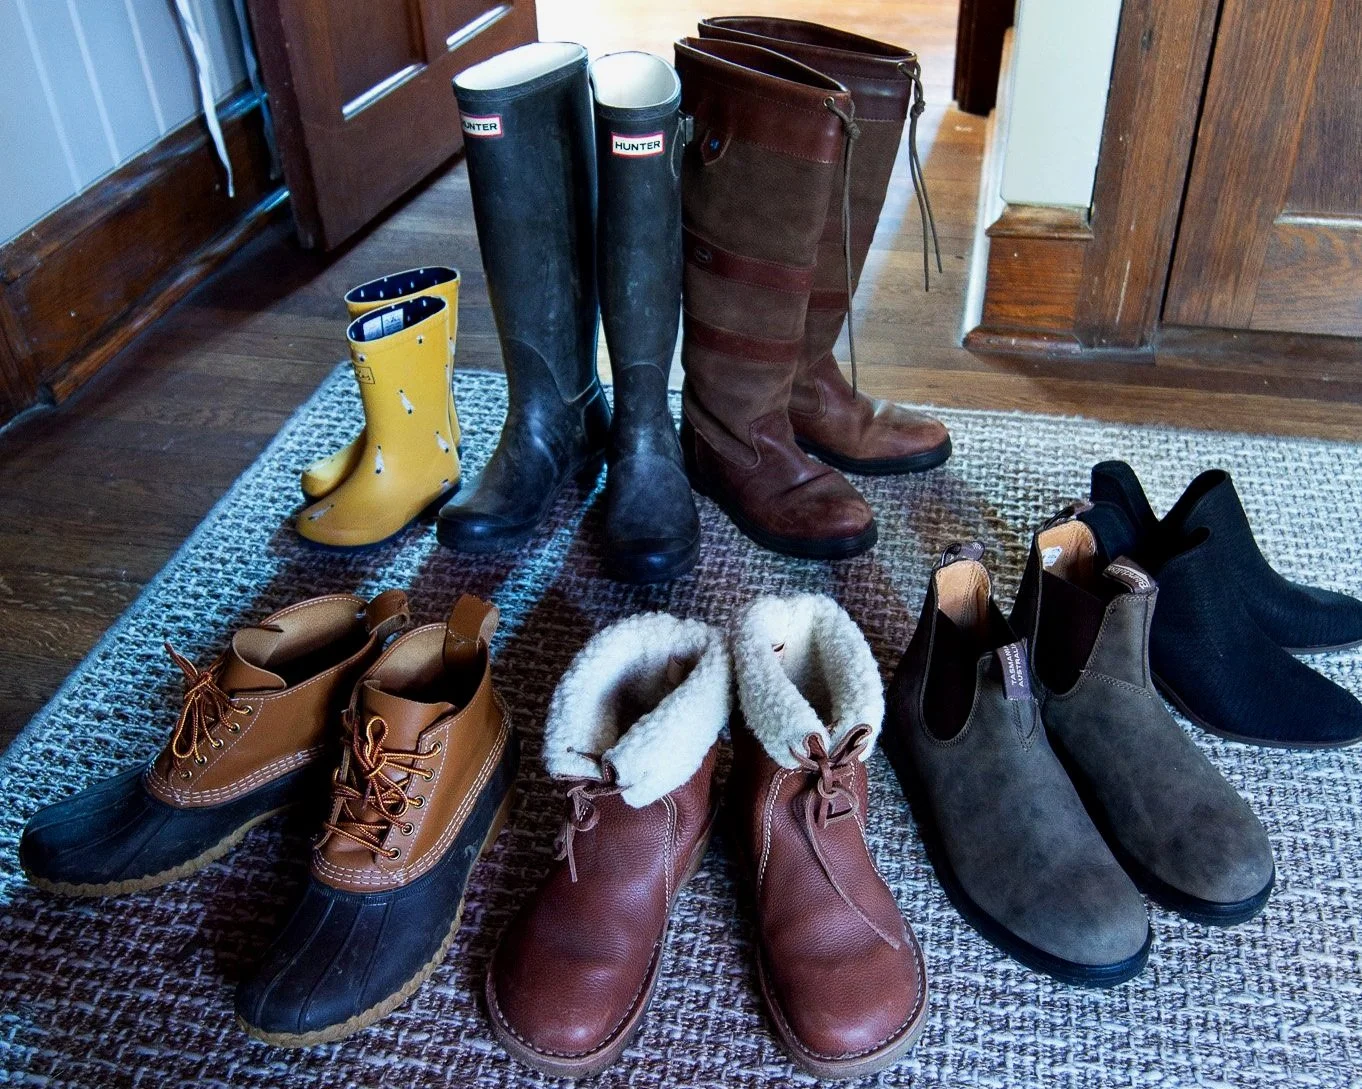
Left to right from the back: Joules wellies for the whole fam, Hunter wellies, DuBarry waterproof boots, LLBean “Duck” Boots, Duck Feet insulated boots, Blundstone waterproof boots, Lucky Brand ankle fashion boots.
(not pictured as they’re in storage, but still highly recommended: Bogs rain boots for kids, Merrell snow boots and Columbia snow boots for kids, Sorel snow boots women, Muck boots, & Sam Edelman fashion riding boots for women) *yes, these are affiliate links gotta earn a few pennies
And they lived happily ever after… chucking boots about the place!

We hope you’ve enjoyed this reveal and would love to hear your thoughts or questions about the space. We’re cracking on with getting our kitchen finished soon, along with our big kids’ room. Then we’ll be onto our primary bedroom suite, how exciting is that?!?
Love & cuddles,
Lex