
One Room Challenge – The Kitchen (Week 1)
Ahh the big kahuna! The kitchen!! Welcome back for round 3 of our Spring 2020 One Room Challenge room reveals. Not sounding familiar? Check out the last two day’s posts about Aemelia’s room (our 3 year old daughter) and Henry’s room (our 18 month old son) which we’re also transforming during these 8 weeks…because we are stark raving mad. And because we’re using this challenge as the ultimate deadline to finally move into our beautiful stone Tudor house. I apologise in advance this is a super meaty post and quite lengthy as it covers almost 8 months of activity…
THE BACKGROUND
We closed on our fairytale 1929 Tudor revival (in a Quaker suburb of Philly) back at the end of September, with the intention of completing a pretty major extension within 6-12 months. (Did I mention we were bonkers?) You see, we had already done it in Atlanta when we bought our 100 year old farmhouse in the middle of the city, and we managed to buy the house, get plans, have permits approved and completely renovate in the space of 9 months – all while I was pregnant with our first child! Looking back, it was nothing short of a minor set of miracles that had to happen and we recognize now, it is certainly not a normal time-frame for a renovation!


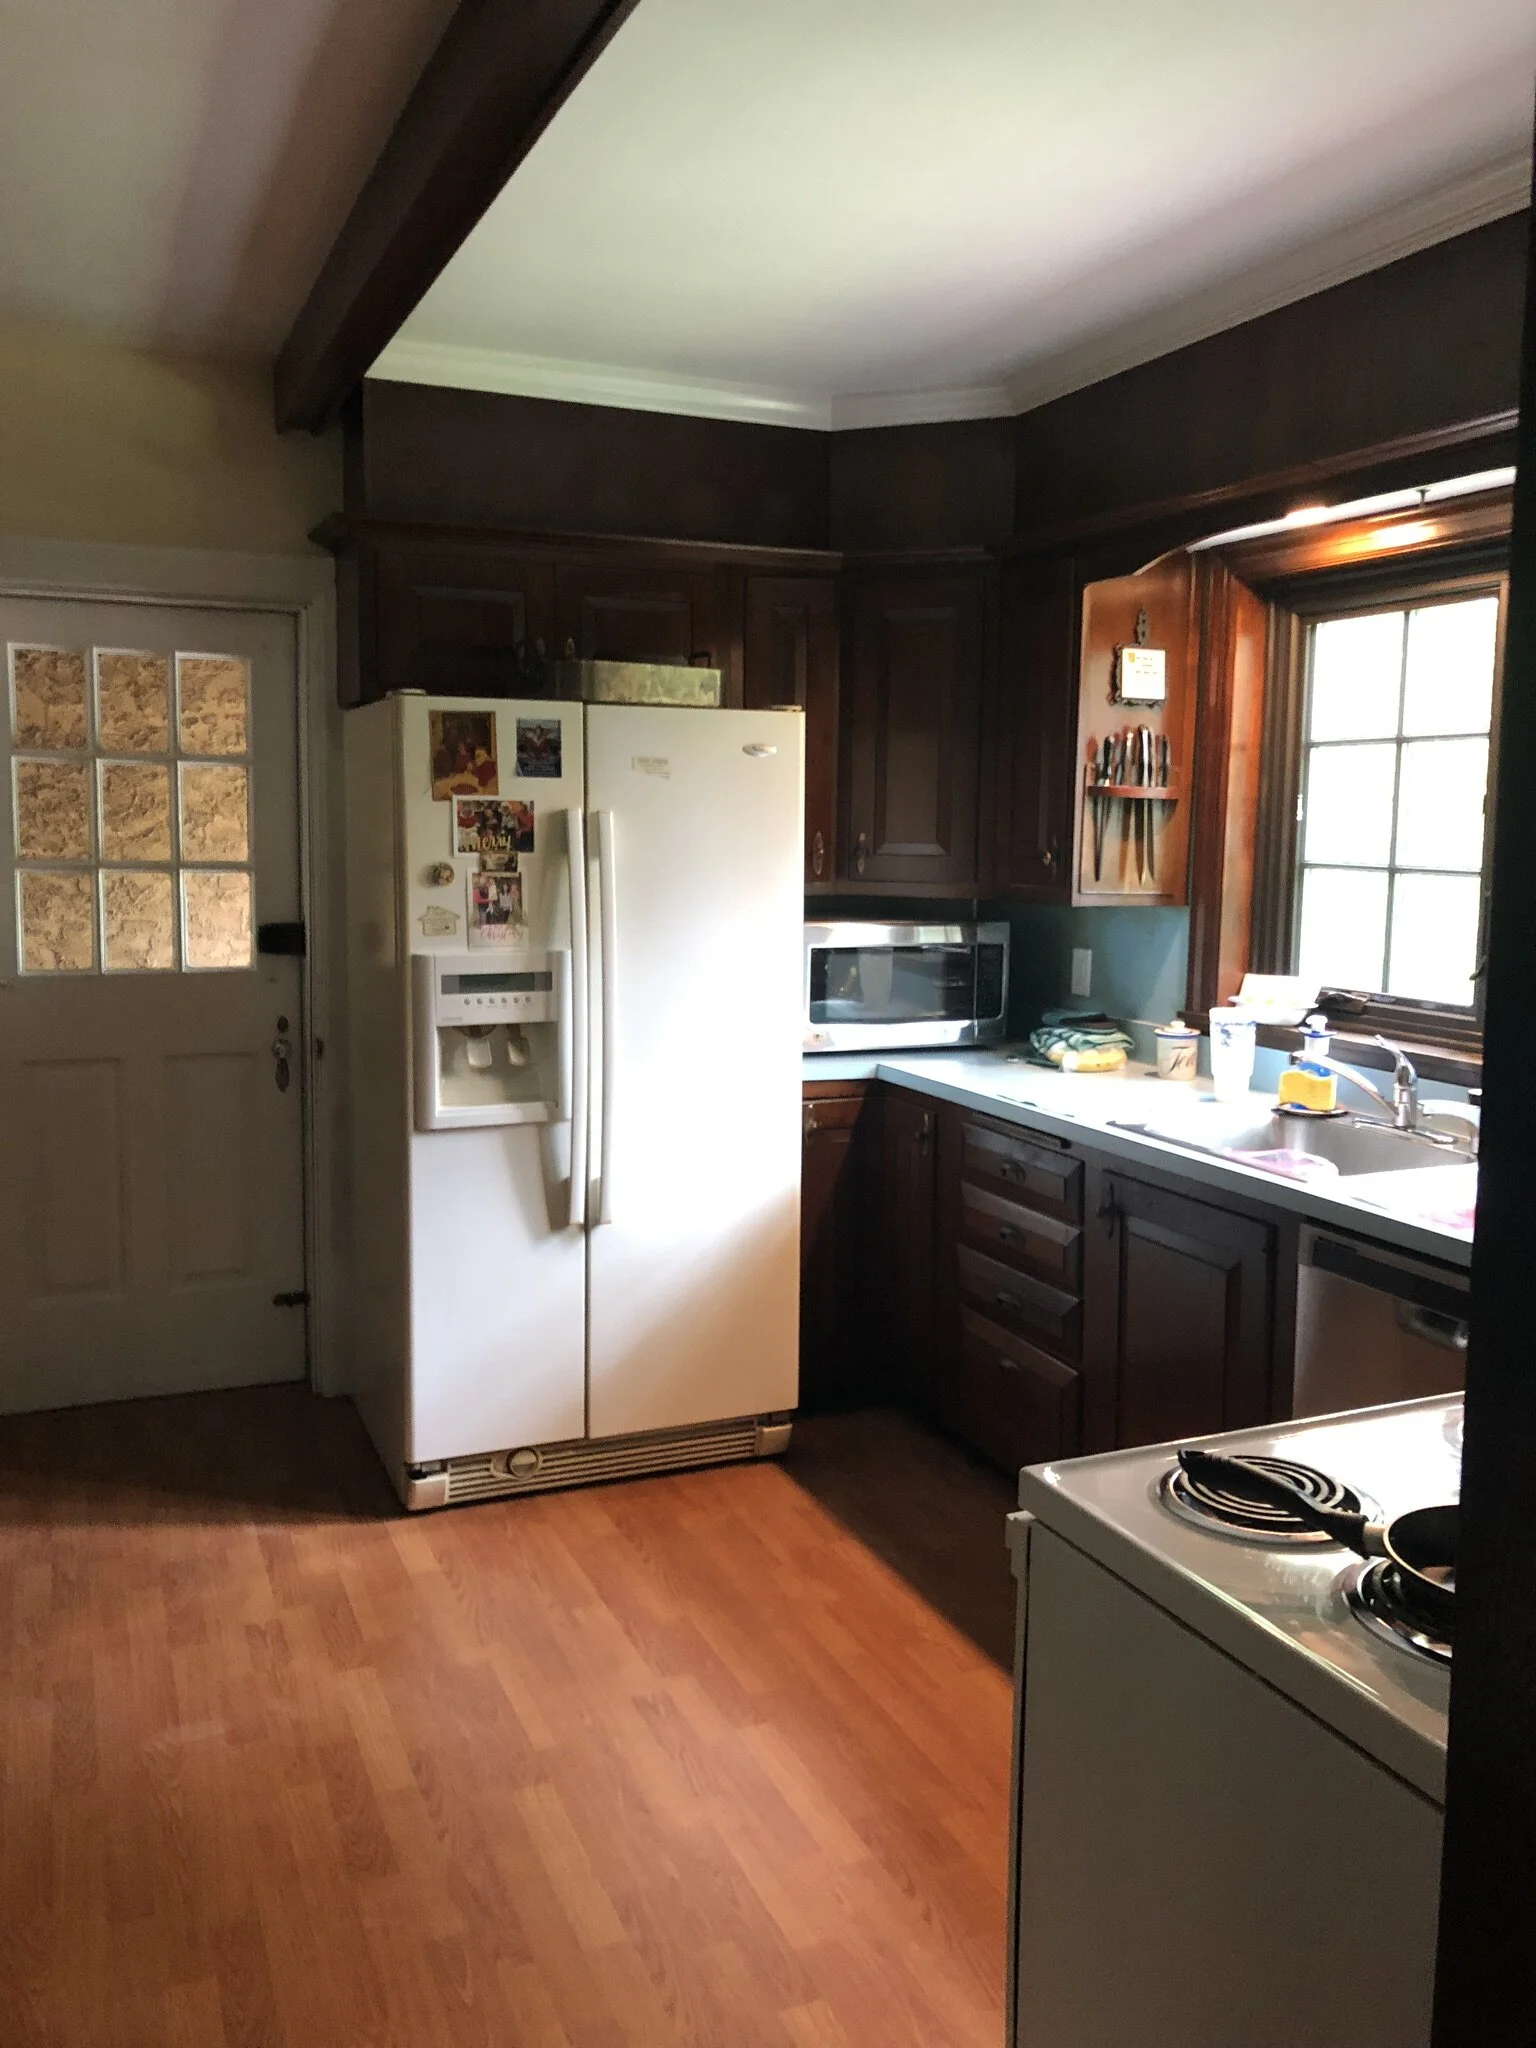
Nevertheless, we persisted. When we closed on this house, we were already talking with the architect, and the goal was to break ground by Feb/March 2020. By the end of November, it was clear that money was being spent quickly by the architectural firm, and the pace was moving slowly. Plus good builders in the area weren’t available for at least 9-12 months. We ultimately realised it would be at least a year or two before the renovation really happened and we didn’t want to be in our temporary townhouse that long. So, we pivoted and decided we would continue with the renovation plans, but would just move in immediately to enjoy the house while we were working up to the bigger event. The house is more than big enough for our current needs, but there was one major flaw. We’re kitchen people, we spend 90% of our time in the kitchen, and the current kitchen was straight out of 1979 – complete with 40 years worth of grease, grime, dust and smoke that would never have come out. The kitchen was one of the primary purposes behind the big renovation, but we stupidly thought we could just do a *quick* cabinet refresh as a temporary measure, add a new range and bob’s your uncle, we’ll be moved in by end of Feb. BAHAHAHAHA!!!


SO HERE’S WHAT HAPPENED – THE EVOLUTION OF A KITCHEN RENOVATION (between Nov 2019 up to now in May)
*One added note: our temporary accommodation and our Tudor house are a whopping 40 minutes away from each other, so renovation days taking planning and babysitting coordination, and we can’t just pop over to do work here and there at night. Our son also did not adapt well to daycare when we moved to Philadelphia, so I stopped freelancing to be more of a stay-at-home mum to him until he was old enough to be eating / sleeping / socialising properly. This means the only days we get to work on the house are any days Stu’s parents are able to look after the children. In the last few months, we have set it up that I am at the house by myself two days a week, and on Saturdays Stu joins me for bigger work and team projects.
We’ve been doing weekly IGTV videos with demo progress, so please go check that out if you want the full run-downs! Or check out our “Kitchen – Phase 1” highlight on Insta for the story scoop to date.
SEPTEMBER 2019: Closed on house, in talks with architects about major extension including new kitchen, goal was to break ground by Feb/March.
NOVEMBER 2019: things moving very slowly with architects; realised it would be a year or two before we could properly extend, and would move in instead – but first we would do a *quick* refresh as a temporary measure. Anything we put in now, would ultimately end up in the basement as part of a full bar area or second kitchenette, so nothing would be ‘wasted’.
BLACK FRIDAY 2019: Used huge sales period to buy first set of IKEA cabinets, Semihandmade Doors, dual-fuel LG range and dishwasher. Got almost all of them for 20-25% off.
EARLY JAN: Started kitchen demo - removing cabinets, beams, etc. Ran into small electrical snafu that meant we called in an electrician.
MID JAN: Made decision based on that electrical visit to re-wire THE ENTIRE HOUSE. Our electrical in many places was fraying and at risk of being faulty, so a major fire hazard. #sobsquietly
END OF JAN: Continued demo, but ran into interesting wall set-up. Concerned we were dealing with asbestos, we paused and sent off samples for testing. (Takes 2 weeks to get back)
MID FEB: Asbestos tests came back negative (hoorah!), so back in kitchen, removed laminate wood floors ( & determined a previous owner has covered over original hardwood with subfloor & tile???!! whyyyyyy!!!), removed original cabinets as they started falling apart as we removed the formica countertop. Removed all old mastic on walls (yuiighh). Built first set of IKEA cabinets.
END OF FEB: Electrical rewire of whole house began. Completely revamped kitchen plan moving fridge. Started looking at floor options and other finishes.
EARLY MAR: Got bigger renovation/extension plans back (first round). COVID-19 became a big deal. We shifted priorities and the kitchen became a more ‘permanent’ solution.
MARCH: The in-laws (our primary babysitters) go on vacation for two weeks so no progress at the house. Use time to paint Semihandmade cabinet fronts (full post about that here). Hacked sink cabinet to fit a farmhouse apron sink. Began talks with WarmlyYours for radiant underfloor heating partnership. Revamped kitchen plan again.
EARLY APRIL – Sanded every last inch of kitchen.
MID APRIL - Got this blog live!
APRIL - Electricians fixed lighting issues, shifted fridge outlet to other side of the room, fixed laundry closet outlets, added vent hood wiring (there was no hood before), added 6 recessed spot lights, added two pendants and two motion sense lights for laundry closet and cleaning cupboard.
ALSO APRIL - Electricians made HUGE holes all over kitchen due to concrete & stone walls (so they couldn’t thread like in other rooms), so had to get walls patched.
END OF APRIL - Finalised partnership with radiant flooring (read all about the planning phase of that in the linked post). Finalised kitchen plan. Figured out rest of flooring and limestone tile arrived.
EARLY MAY - Primed walls. Painted Ceiling. Pendants installed.
THE EVOLUTION OF A KITCHEN LAYOUT
Over the space of that timeline, the layout of the kitchen also changed dramatically. Below you can see some sketches and renderings I’ve done over the last few months detailing how things changed. Even now we’re still adapting pieces as we go!
These first renderings and architectural plans are actually of the new kitchen/dining space as I envisioned it after the big renovation would be done – an open concept but with defined spaces, modelled after a pub dining area and classic English kitchens, with Tudor features like small reclaimed oak beams, full length cabinets, leaded glass windows and arched external doorways to make it match the rest of the house.A design by Jessica Helgerson (from another Tudor Revival in the Pacific Northwest) and a classic Devol kitchen were my main sources of inspiration.


The rest are layouts of the kitchen as it stands now (with no renovation), and how we’ve adapted it over time. The biggest change was when we realised the architect’s plans which we had used in our hurry to order cabinets during Black Friday, were off by a few inches. So upon re-measuring our cabinet plan had to completely change, we added an island with the surplus cabinets due to these changes, and set to building more custom components ourselves. The electrical re-wiring occurring also meant that we had the opportunity to move the fridge in the plan, which massively opens up the layout. And then when we partnered with Warmly Yours for the underfloor heating, it meant we had to very clearly define exactly where all cabinets would be – so we finally created a master plan!


The last thing to note is that our overall plans for the big renovation changed too about 3-4 weeks into COVID-19 being a serious issue. It has affected our finances (obviously), and during this time we’ve had a lot of space of mind to reflect on what we really wanted and needed. We realised that we have plenty of space to play with as the house stands now, that we were renovating primarily to get a bigger kitchen, and that we needed to pare down our desires relative to what we have always known – smaller British spaces and quaint family feel, not massive mansions. Following so many new people back home in the UK reminded me daily that we were getting carried away. Just because we could do a big renovation, didn’t mean that we should!! Our current kitchen was plenty big enough. As such, we’ve broken off plans with our architects, and decided to make some of the kitchen features more permanent instead. So we’re changing plans from “temporary” (i.e. later basement bound) appliances like the freestanding LG range to a more mid-grade nice range with higher gas BTUs from Hallman Industries, we’re looking at nicer fridges than the one we’ve always had in our garage, and are even considering getting soapstone templated rather than the butcher block we had planned on before.
THE INSPIRATIONS
Overall our goals for this kitchen have been to bring it back in line with the rest of the house. Every other room in the house maintains the character of a 1929 home, but the kitchen stuck out like a sore thumb and contained cracking, peeling lead paint everywhere too. We wanted to install clean cabinetry that wouldn’t break the bank (so we could save up for custom as part of the bigger renovation), adding features that would look original (like stone floors) but also modernising at the same time in keeping with today’s cooking and living needs (more lighting, underfloor heating, dual fuel range, vent hood, etc). The design inspirations have always been the more classic British kitchen designers like Devol, Plain English and Humphrey Munson, but we’re going to attempt that look using IKEA cabinets with DIY Semihandmade cabinet doors and drawers, and many custom elements we’ll be integrating and building ourselves.
English country kitchen was the aesthetic we wanted, but that has evolved slightly as well, as plans for other rooms came together and we’ve added a touch more glamour and bold depth to the general scheme of the house. For example, we opted for a moody dark green (Studio Green by Farrow and Ball) for the cabinet colour, are considering darker putty taupe for the walls, and now potentially black soapstone for the counters. Here is the original moodboard, and now the current flatlay design!


THE CHALLENGES
I’ve outlined most of the challenges to date in the timeline, but the usual ones still exist of course – being an old house, the lack of anything being plumb or level is pretty standard. The walls of the kitchen are off-square by almost an inch on either side!! – we had to measure about 6 times before we figured that out…
(1) The Basement Hole – when we opened the built-in cupboard nearest the laundry closet, we learned that it was only half a cupboard, and the other half contained a slanting piece of wood at an odd angle (not for storage). As we traveled down the basement stairs, it became clear this strange cabinet construction was necessary to provide the head height clearance for walking down the stairs. So we will need to rebuild that and try to make the design a better use of storage space.
(2) The Dual-Way Swinging Dining Room Door – currently swings on the internal rather than external hinge, so that the door sits in the middle of the room in both the kitchen and the dining room when it swings to and fro. We re-arranged the range & counter configuration to reduce fire hazard to that the door can swing against the walls and counter instead, improving flow through both rooms.
(3) The Old Laundry Chute – we’ve considered taking it out, but we just don’t know if it’s worth it?! Or how?! But it takes up an awful lot of room for something that’s never going to be used again, in a cupboard where we could really use that space back!
(4) The Vent Hood – the kitchen had no vent hood over the stove before, just a blank wall and a useless soffit above. Code now requires a vent hood in the kitchen, but with 3’ stone walls on the window wall, and a basement below (which code requires all vents must be external in Pennsylvania), we have to find a hood insert that is recirculating but still allows us to build a custom fixture around it for style. A conundrum but we think we’ve solved it..
(5) IKEA Delivery – So I just placed an order two days ago for the remaining IKEA cabinets we needed (notably for the revised built-ins) and they won’t be delivered until June 19th!!! So if we’re serious about getting a reveal done for June 25th, we may have to do some serious logistical planning for that week with countertops, etc. EEEK!


THE TO DO LIST:
- Demo the whole kitchen
- Repair and sand walls
- Prime walls & ceiling
- Decide on paint colours
- Paint walls & ceiling
- Build IKEA cabinets
- Add trim to & paint Semihandmade cabinet fronts
- Order second set of IKEA cabinets
- Order second Semihandmade fronts
- Order cabinet hardware
- Repair sub-floor in patches where it doesn’t exist
- Install underfloor heating
- Install floor tile – lay tile, seal, grout, seal again
- Replace trim + paint
- Source vent hood
- Create vent hood mount & cover
- Install Semihandmade doors on cabinets
- Install IKEA cabinets we have so far
- Install hardware on cabinets
- Install sink & garbage disposal
- Install dishwasher
- Install range
- Move fridge from townhouse & Install
- Build base for island cabinets, add backing, trim & casters
- Add trim & paint second set of Semihandmade cabinet fronts
- Build custom cabinet spacers for rest of kitchen
- Build custom cabinet around basement hole
- Build custom frame for hood
- Get countertops templated
- Buy lumber & brackets
- Sand & paint brackets and shelves
- Install open shelves
- Install countertops
- Install faucet and tapmaster
- Install washer & dryer
- Build new doors for laundry cupboard
- Install second set IKEA cabinets
- Install second set Semihandmade fronts & hardware
- Build custom cabinets for wine racks
- Build custom herb & jar hidden cupboard
- Add baseboard & crown molding trim to built-ins
- Source tile / back splash
- Install tile
- Re-build cleaning cupboard (around or remove?! laundry chute)
- Build new doors for cleaning cupboard
- Move in all kitchen stuff
- MAKE STIFF DRINKS TO CELEBRATE!
- Style & photograph!
So there you have it folks! What we’re up against and the mammoth task list in front of us to get this project completed. It’s been a journey already, but we hope this is where the fun part really begins as we start putting the kitchen back together. Glad to have you along with us for the ride!! Here we go! Be sure to sign up to our mailing lists to not miss a blog post and to see the weekly progress. ;)
Love & cuddles,
Lex

IMPORTANT LINKS:
One Room Challenge sponsored by Better Homes and Gardens.
Featured Designers for April 2020:
A Glass of Bovino | Beginning in the Middle | Beth Diana Smith | Clark + Aldine | Coco & Jack
Deeply Southern Home | Design Maze | Dwell by Cheryl | Erika Ward | Home Made by Carmona
House of Hipsters | Hunted Interior | Kandrac & Kole | Kate Pearce | Katrina Blair | Liz Kamarul
Veneer Designs| Rambling Renovators | Renovation Husbands | Studio Plumb