
It’s Gonna Get Hot in Here! (or warm at least….)
Our kitchen renovation has undergone so many phases within itself, we’ve lost count of the phases and lost track of what day or week in the renovation we’re even in. But what we do know, is that our kitchen plan has become a little bit more of a permanent plan now, compared to the ‘temporary’ phase it was supposed to be. And, ever since we ripped up the awful 70’s laminate wood flooring, we knew we wanted a limestone floor instead, to be more in keeping with the historic nature of our 1929 Tudor revival. Now, there’s just one drawback to stone flooring (in our books), and that is just how flipping cold it can be underfoot in the colder months (at least half the year here in Philly). We’ve grown up in English homes where stone is normal in the kitchen, but so are slippers or shoes at all times, and let’s face it that’s a bit constricting for us bare-foot hippy types... Plus there is no other heat source in the kitchen, compared to every other room in the house having a radiator. So, we absolutely KNEW beyond a doubt, that we had to install underfloor heating beneath the stone to act as both our primary heat source and an enjoyable underfoot experience every day. #happyfeet


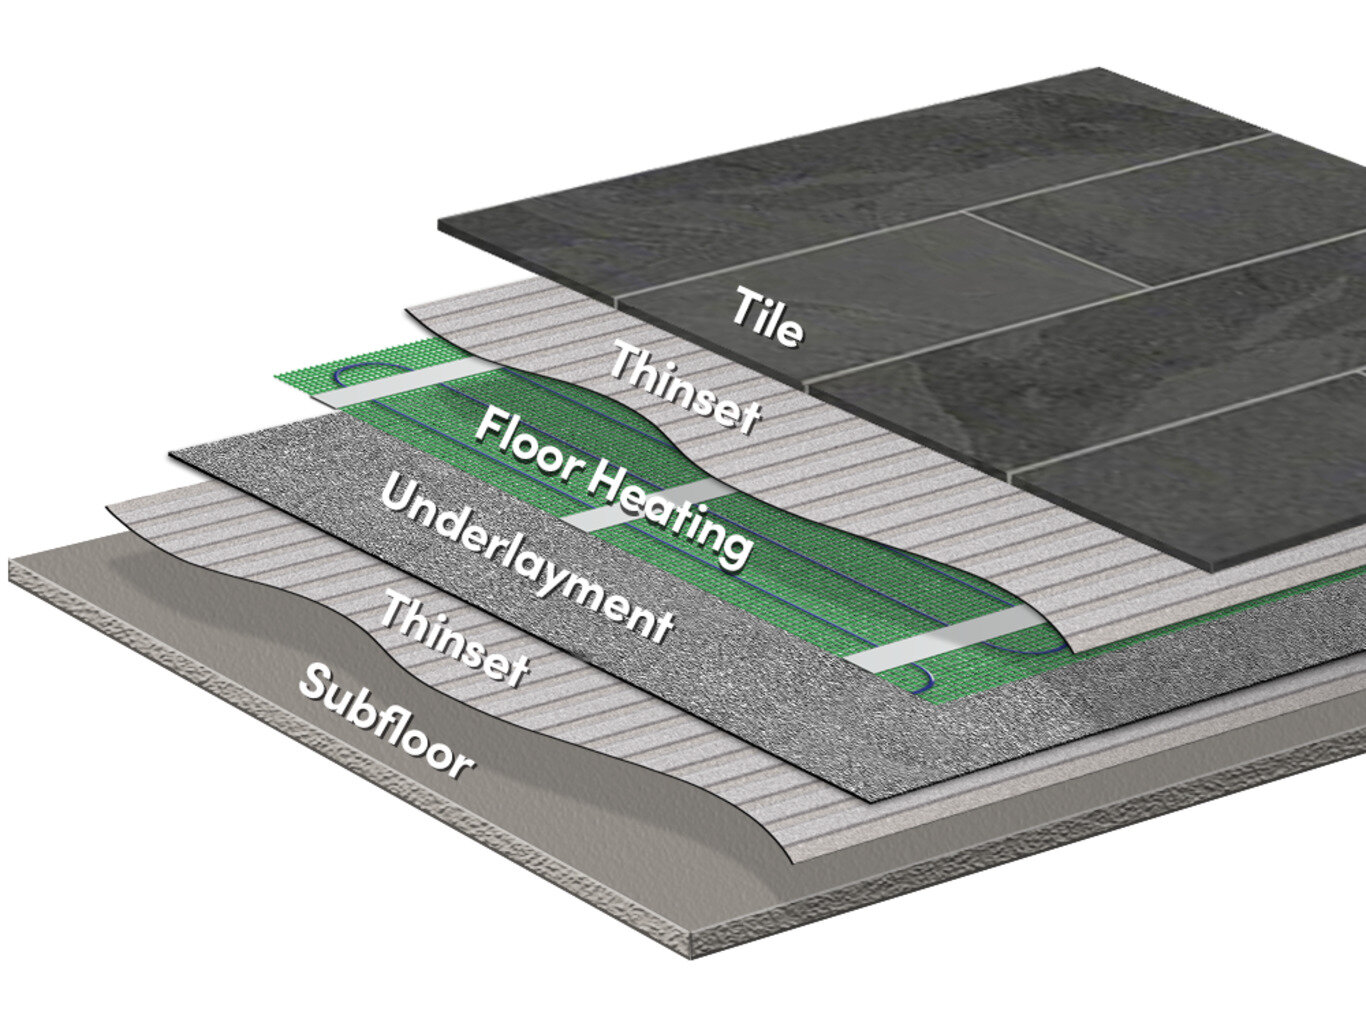
Fast forward about 4 weeks and you would have found us in the depths of researching how expensive it is to lay radiant heating systems (most are affordable), whether it costs an arm and a leg to run all the time (it doesn’t), and if it was even possible to do ourselves (we definitely think so). Our research of DIY systems definitely led us to the electric radiant flooring options, opposed to the hydronic (heated water) systems which are certainly more technical and complex to install, usually done by professionals. Electric is really suited for renovations, whereas hydronic is better for new construction or complete overhauls. Then, we got connected with WarmlyYours who are providing us with their TempZone Flex Roll system – a series of green mesh mats with electrical heating cable laid in 3” serpentine pattern, that you literally unroll and form to their specified electrical plan over your sub-floor, add a layer of thinset or self-leveling under-layment (cement) and then lay your tile as normal on top. In their words “It operates like an electric blanket for your floors. The system provides a warm, even temperature across your floor, generating floor-to-ceiling radiant warmth to transform these naturally cold surfaces into warm floors. Ideal for kitchens, bathrooms or any room in your home where you would enjoy radiant warmth and comfort, the TempZone™ floor heating system is easy to install, operate and maintain.” We really liked that it was both safe, and energy efficient, as we try to be as sustainable as possible during any renovation.


To say we were excited to proceed is an epic understatement!! Our goal here is to prove to both ourselves and our followers, that this shouldn’t be a daunting task. Does it take planning? Sure. Is it an overnight project? Nope, but then that’s not what we do. Will the team at WarmlyYours help you through every step of the way and answer any question you have? Abso-frickin-lutely. Are we nervous? Yes, but in a good, can’t-sleep-at-night-because-you’re excited, kind of way. So what follows is a break down of the steps we’ve been through to date and considerations as we went through the process. We plan to actually install the system this Thursday/Friday (May 7th), followed by installing the tile on Saturday/Sunday. It’ll be one big flooring event and we’ll share it all in real-time as we go. Another big juicy blog post will follow once we’re all done and with some pretty pics 😉
Getting into this process was insanely easy – WarmlyYours have one of the most comprehensive websites I’ve ever come across, with every question already answered complete with a technical drawing, and every form of support available. And on top of that, they’ll chat you through it all on the phone too. They offer a free no-obligation “SmartPlan” service, where all you have to do is provide your floorplan with dimensions, and they’ll get back to you in 1-2 days with a 4-part document: the best product for your need clearly itemised with pricing, and an installation plan with heated area mapped, and an electrical plan explaining what you need to get the system running. I initially sent them my architectural rendering of the kitchen top down, which is to scale, but doesn’t have actual dimensions (not helpful, I can be a right pillock). Given that I couldn’t get to the house for a while, I then decided to send over a snapshot of the actual architect’s floorplan using their scale for measurements (made me nervous as their measurements are still a bit general). And this is the SmartPlan that Warmly Yours sent back within 24 hours (click to make it bigger). We were also assigned at this time with a project manager who acts as the liaison between the electrical engineers and the customer, but has all the technical knowledge to answer all of your questions.


From this point on, any back and forth was 100% down to Stu and I not completely having our ducks in a row and being delayed between emails. We’ve been so manic with all the different house projects and organizing the minutia of the 100% electrical re-wire in the house that we still hadn’t at the early stages of this process even measured the kitchen down to the last inch (as we should have by now). If we had been a bit more buttoned up from the start, this whole process would have taken less than a week. So finally, we got back to the house and measured, re-measured, and measured again every last inch. Of course, the kitchen is off by almost a full inch on two walls, meaning it’s not plumb in the slightest. But it enabled me to pull my finger out and produce a proper dimensional plan that we felt confident in using for a technical purpose like this. Every last inch was accounted for, and we laid out the yellow area which we wanted to fill with the heating mats.

During this part of the process, we also started really getting into the details of how the heating would be laid down in technical terms, and chatted quite a bit with Alex @oldtownhome about his process too (he did his back in 2014). While the plan is straightforward, our kitchen has lots of quirks still for a relatively small space (about 200 sq ft) and we needed to be mindful of how we would work around those. Plus, we wanted a little bit of wiggle room. You can’t alter/cut/adjust the cable attached to the mats to make up for more or less space since this would damage the mat and disrupt the balance that allows it to provide the specified amount of heat. So instead we built in small 2” and 3” borders around the cabinets and appliances to give us a sense of security in terms of the heating mat being too close to any permanent and heavy fixture. So we ended up going back and forth a bit with the WarmlyYours team and getting this plan next:

Our basic plan is to use a ¼” inch cement board (Hardibacker) border under all of the cabinets, in front of doorways, in the laundry room, and in the entryway. Then to place the heating mat in the center opening of the board and lay the Flex Rolls down (1/8” inch) followed by another 1/8” of self-levelling cement (SLC). This ensures that we are able to cover the many holes between the walls and sub-floor with cement board, can create a super level surface across the whole floor for laying the over-size stones, and contain the SLC easily in the middle pocket where the subfloor is solid already (not to fear leaking of the SLC down into the basement). We utilized many of the simple videos that WarmlyYours has on their website, we studied the FAQ, and we’ve taught ourselves a fair amount already!
Our challenges are as follows:
Our cabinet structure is not the same as most kitchens, as we have almost 8 custom built open boxes in our base cabinets, which we building using @semihandmade side panels. This means that the side panels are the full depth and height of the cabinet, and don’t allow for the typical 3” of toe-kick space below a cabinet where you could typically lay heating mats still. (You don’t lay any electrical heating under cabinets, and don’t want anything heavy resting on top of cables permanently)
The entryway to the kitchen is particularly narrow, with the little cleaning cupboard off one side and the basement door off of the other. We had originally planned to heat this space, but ultimately decided it was complicating it more than it was worth and removed it from the plan. The reason being is we’re just not sure yet how we’re going to upgrade the basement stairs, and not heating this space gives us future wiggle room.
We have that blasted basement stair hole to deal with, so it creates an off 21” jut out in the kitchen, which is not perfectly in line with the laundry closet when it comes to laying down a cement board border.
The rest of our kitchen pantry full-cupboard wall is only 19” deep, and besides the hole, it doesn’t have subfloor on it (just the old hardwood below the subfloor, oi vey! #facepalm)
The range and the fridge that we have at the moment will both jut out almost 30” – which again messes with the even column plan. Due to ever changing plans, we do intend to replace both of these with more counter-depth items eventually, but even on a temporary level we can’t have heating mat below them.
So taking all that into account, the last plan they gave us was fine generally speaking but didn’t allow space for our basement hole (which we hadn’t explicitly mentioned before or annotated on the plan), and gave us very little wiggle room with the fridge, range and cabinets. Instead, we went back with a suggested plan where I laid out the mats myself and asked the team if it would work. (Note: they would have done this, but I’m a control freak that way…) It was here where I realised and was educated more thoroughly by the team that the mats were sold/available in set lengths, which are designed to work for the specific voltage, watts and ohms so that they provide 15 watts of heat per square foot. DUH LEX! Of course, this is precisely why THEIR team does the laying out, and a certified engineer provides the plan. And on the right is what their team came back with in our final round.


At this point, we all did a big hooray shout (or at least we did!), signed on all the dotted lines, and two days later our WarmlyYours box arrived on our doorstep. Super fast shipping! So, with that, here’s a little pic of our kitchen “before” where we are starting from this Thursday. So stay tuned to Instagram stories for all the behind the scenes fun, and we’ll see you on the flip side with a second meaty blog post hoping this has all gone smoothly and to plan! Wish us luck!!

Love & cuddles,
Lex & Stu